vegetable garden
- Isabelle

- Jun 3, 2023
- 6 min read
Updated: Oct 15, 2023
Growing vegetables in our urban backyard is not as easy as one may think.
History of our gardening challenges
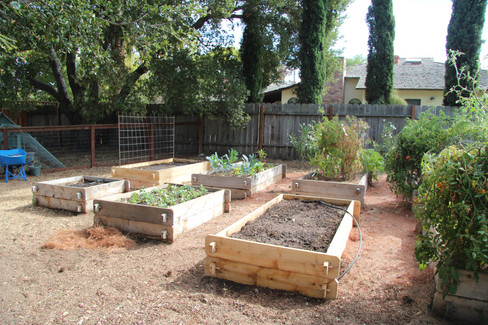
We started growing vegetables in 2009 when we moved into a house with a big yard. We built raised beds in the sunniest spot. They were on top of the rich native clay soil and filled with a nice vegetable soil blend we bought by the cubic yard [1]. It was a big project, but totally worth it. We had an amazing production the first year. By the second one, the critters had found our address; squirrels feasted on the veggies during the day while rats partied on them at night. We planted more vegetables thinking that we could share the bounty. Well, the critters didn’t get the memo, they just came with their friends and their extended family for an all-you-can-eat buffet! We then built cages to protect our produce and that worked. That is until the oak trees grew and started shading the beds, they also found that they could put their roots in the beds and get delicious food and water! Since we love our big trees, we undertook the arduous task of moving of all the vegetable beds and their cages to another sunny part of your yard. We had lots of vegetables for the first couple of years, until the trees found their way back to the delicious soil and stole all the nutrients and water from our vegetables. Enough was enough! We searched for ways to prevent roots to come in the beds, but the solutions were either to dig deep trenches of at least 3’ around the beds and put some metal / plastic barriers in them, or put the barriers directly at the bottom of the beds. The former involved big machines and didn’t guarantee that the roots would never find their way around the moat. The latter prevented the vegetable roots to go deep in the native soil as well as proper drainage. None were satisfying, so in another backbreaking effort, we dug out all the soil, removed all the tree roots, and had one bountiful season until the tree roots came again...
Our solution
Fed up, we decided to give up growing vegetables in the soil and move to container gardening. We emptied the soil from the beds and put big pots in them, so it still looks good and benefits from the cages. Between the native soil and the containers, we placed a layer of bricks to create an air gap. It’s really the only way to prevent roots from going anywhere.
We bought big containers of different sizes: big ones (25 gal) for tomatoes, medium ones (15 gal) for peppers, eggplants... and small ones (7 gal) for smaller plants like basil. We chose plastic containers because they keep moisture in, they are lightweight and much cheaper.
The next decision was choosing the soil to put in the containers. It was challenging because we wanted it to be veganic, sustainable, and affordable. Veganic is a combination of the two words 'vegan' and 'organic'; it’s the organic production of food without the use of farmed animal inputs, it’s also known as stockfree or animal free agriculture [2].
Soil
When growing in containers, you can’t use the garden soil by itself because when it’s put into a pot both drainage and aeration are severely impeded resulting in poor growth. So, we started researching soil potting mixes. There are lots of organic ones with the Recipe 420 Potting Soil [3] being one of the best, unfortunately they contain lots of animal products and byproducts (blood, bones, feathers, manure...). The only veganic potting soil we found is the Free All Purpose Potting Soil from Dr Earth [4], but it can only be bought in small quantity (3-gallon bags are the biggest ones) and it’s quite expensive, certainly too much to fill our vegetable garden. We however bought a few bags to use to start seedlings, and we quickly discovered that there were very few nutrients in that potting soil and required additional fertilizer.
To fully control its content and be cheaper, we needed to make our own potting soil. There is lots of information online, but we quickly decided to follow the well-documented article on homemade potting media from PennState Extension [5]. We chose to make a soil-based potting media over a peat-based one since we wanted to reuse as much of the old soil as possible. The recipe combines garden loam soil, coarse construction sand, and sphagnum peat moss in equal parts by volume. Since we wanted to be as sustainable as possible, we substituted the peat moss by coconut coir [6]. It aerates the soil and holds moisture as well, and it is a readily renewable resource unlike peat moss whose harvest causes massive environmental damage. The purpose of the sand is to improve drainage and aeration, very much like the coir, and since our old soil is already a nice sandy loam, we decided to not add any sand. Instead, we added our homemade compost which also improves drainage and aeration, and brings some organic matter and nutrients to the potting soil. Here is our final recipe:
½ old soil (sandy loam)
¼ coconut coir
¼ compost
The only ingredient we bought was the coconut coir, all the rest we had on site. Below are a few pictures of the process:
Fertilizer
Moving away from the native soil has the huge drawback of losing all the natural nutrients present in our rich clay soil. Before, we had only to add nitrogen, now we have to provide all the nutrients the plants need. And vegetables in particular need a lot of food to produce. Exactly how much was hard to find, there are a lot of fertilizers out there, but each have different NPK ratio that their manufacturers swear by. We didn’t find much scientific data on the topic except for a study on growing tomatoes in hydroponics [7], and we ended up following their feeding guidelines since our homemade potting soil has very few nutrients: feed a balanced fertilizer before flowers, and then feed a fertilizer high in potassium.
Then came the question of soluble versus slow-release fertilizers. We always used veganic slow-release fertilizers in our garden as it feeds the soil and its ecosystem which in turn feeds the plants. But in a container, there isn’t much of a soil ecosystem. The space for roots is limited and nutrients are often lost through frequent watering (which is needed to keep the soil moist) [8]. We chose soluble fertilizers to allow the plants to access the nutrients right away.
Like when searching for a veganic potting soil, we found lots of soluble organic fertilizers but not many were also vegan. The only two soluble veganic fertilizers we found were AGmino (14-0-0) from Down To Earth [9] which is made from soybean and provides the nitrogen, and the Soluble Kelp Powder (0-0-17) from The Seed Supply [10] and provides the potassium. These two products are unfortunately quite expensive. Regarding phosphorus, we could only find one non-animal source which is rock phosphate (0-5-0). It’s mined (so it’s actually inorganic and not really sustainable) but the main issue is that it’s not soluble unless the pH of the soil is below 5.5 which is too acidic for the tomatoes and vegetables we want to grow. So, we ended up giving up on our organic requirement and studied other fertilizers. We chose Jack’s from JR Peters which contains 100% sustainably harvested mineral salts [11].
Finally, we looked at the pH of the soil since it’s critical to make the nutrients available to the plant. Tomatoes do best in a range of 6.2-6.8, and since the pH of our soil was 7, we added some sulfur to lower it.
Conclusion
Container gardening is much harder than in-ground gardening as you basically have to do all the work of Mother Nature :)
Also it’s very hard to find trustworthy information as you can find everything and its opposite on the internet where everyone thinks they are an expert. We tried to stick to university studies as much as we could, but there is very little scientific literature on the topic. As a master gardener, I was particularly disappointed in the California Master Gardener handbook which didn’t provide much useful information in our research.
We completed our project and planted our seedlings in mid’ April. A month and a half later, they all seem to be doing well. We will see how the season goes, and based on its success, we will transition the rest of our raised beds to containers.
Update October 10th: Last harvest from the season. The tomatoes did well and outgrew their cages. We will plant more next year. And the peppers did fantastically and got actually way more peppers than we could eat or dry. We will grow less next year. The basil and zinnias did really well too, although zinnias are really not meant to be in a cage.
References
https://store.lyngsogarden.com/products/organic-lyngso-vegetable-blend-126.html
https://s3.wp.wsu.edu/uploads/sites/2080/2018/03/coconut-coir.pdf
https://extension.umn.edu/managing-soil-and-nutrients/fertilizing-and-watering-container-plants
https://downtoearthfertilizer.com/products/solution-grade/agmino/


